

蚂蚁开放联盟链实战:02-快速开始
开发流程
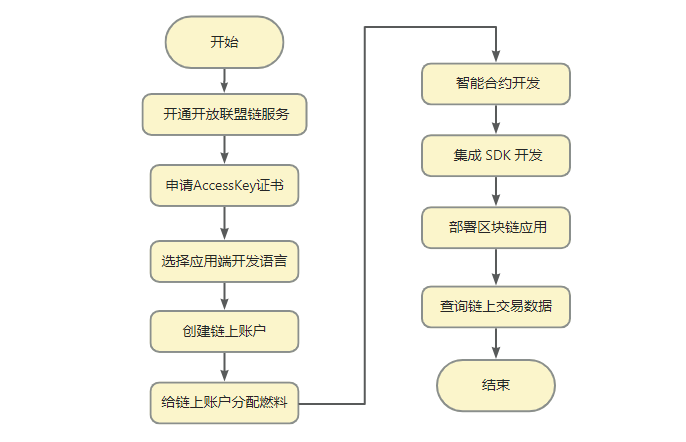
主要包括以下几个步骤:
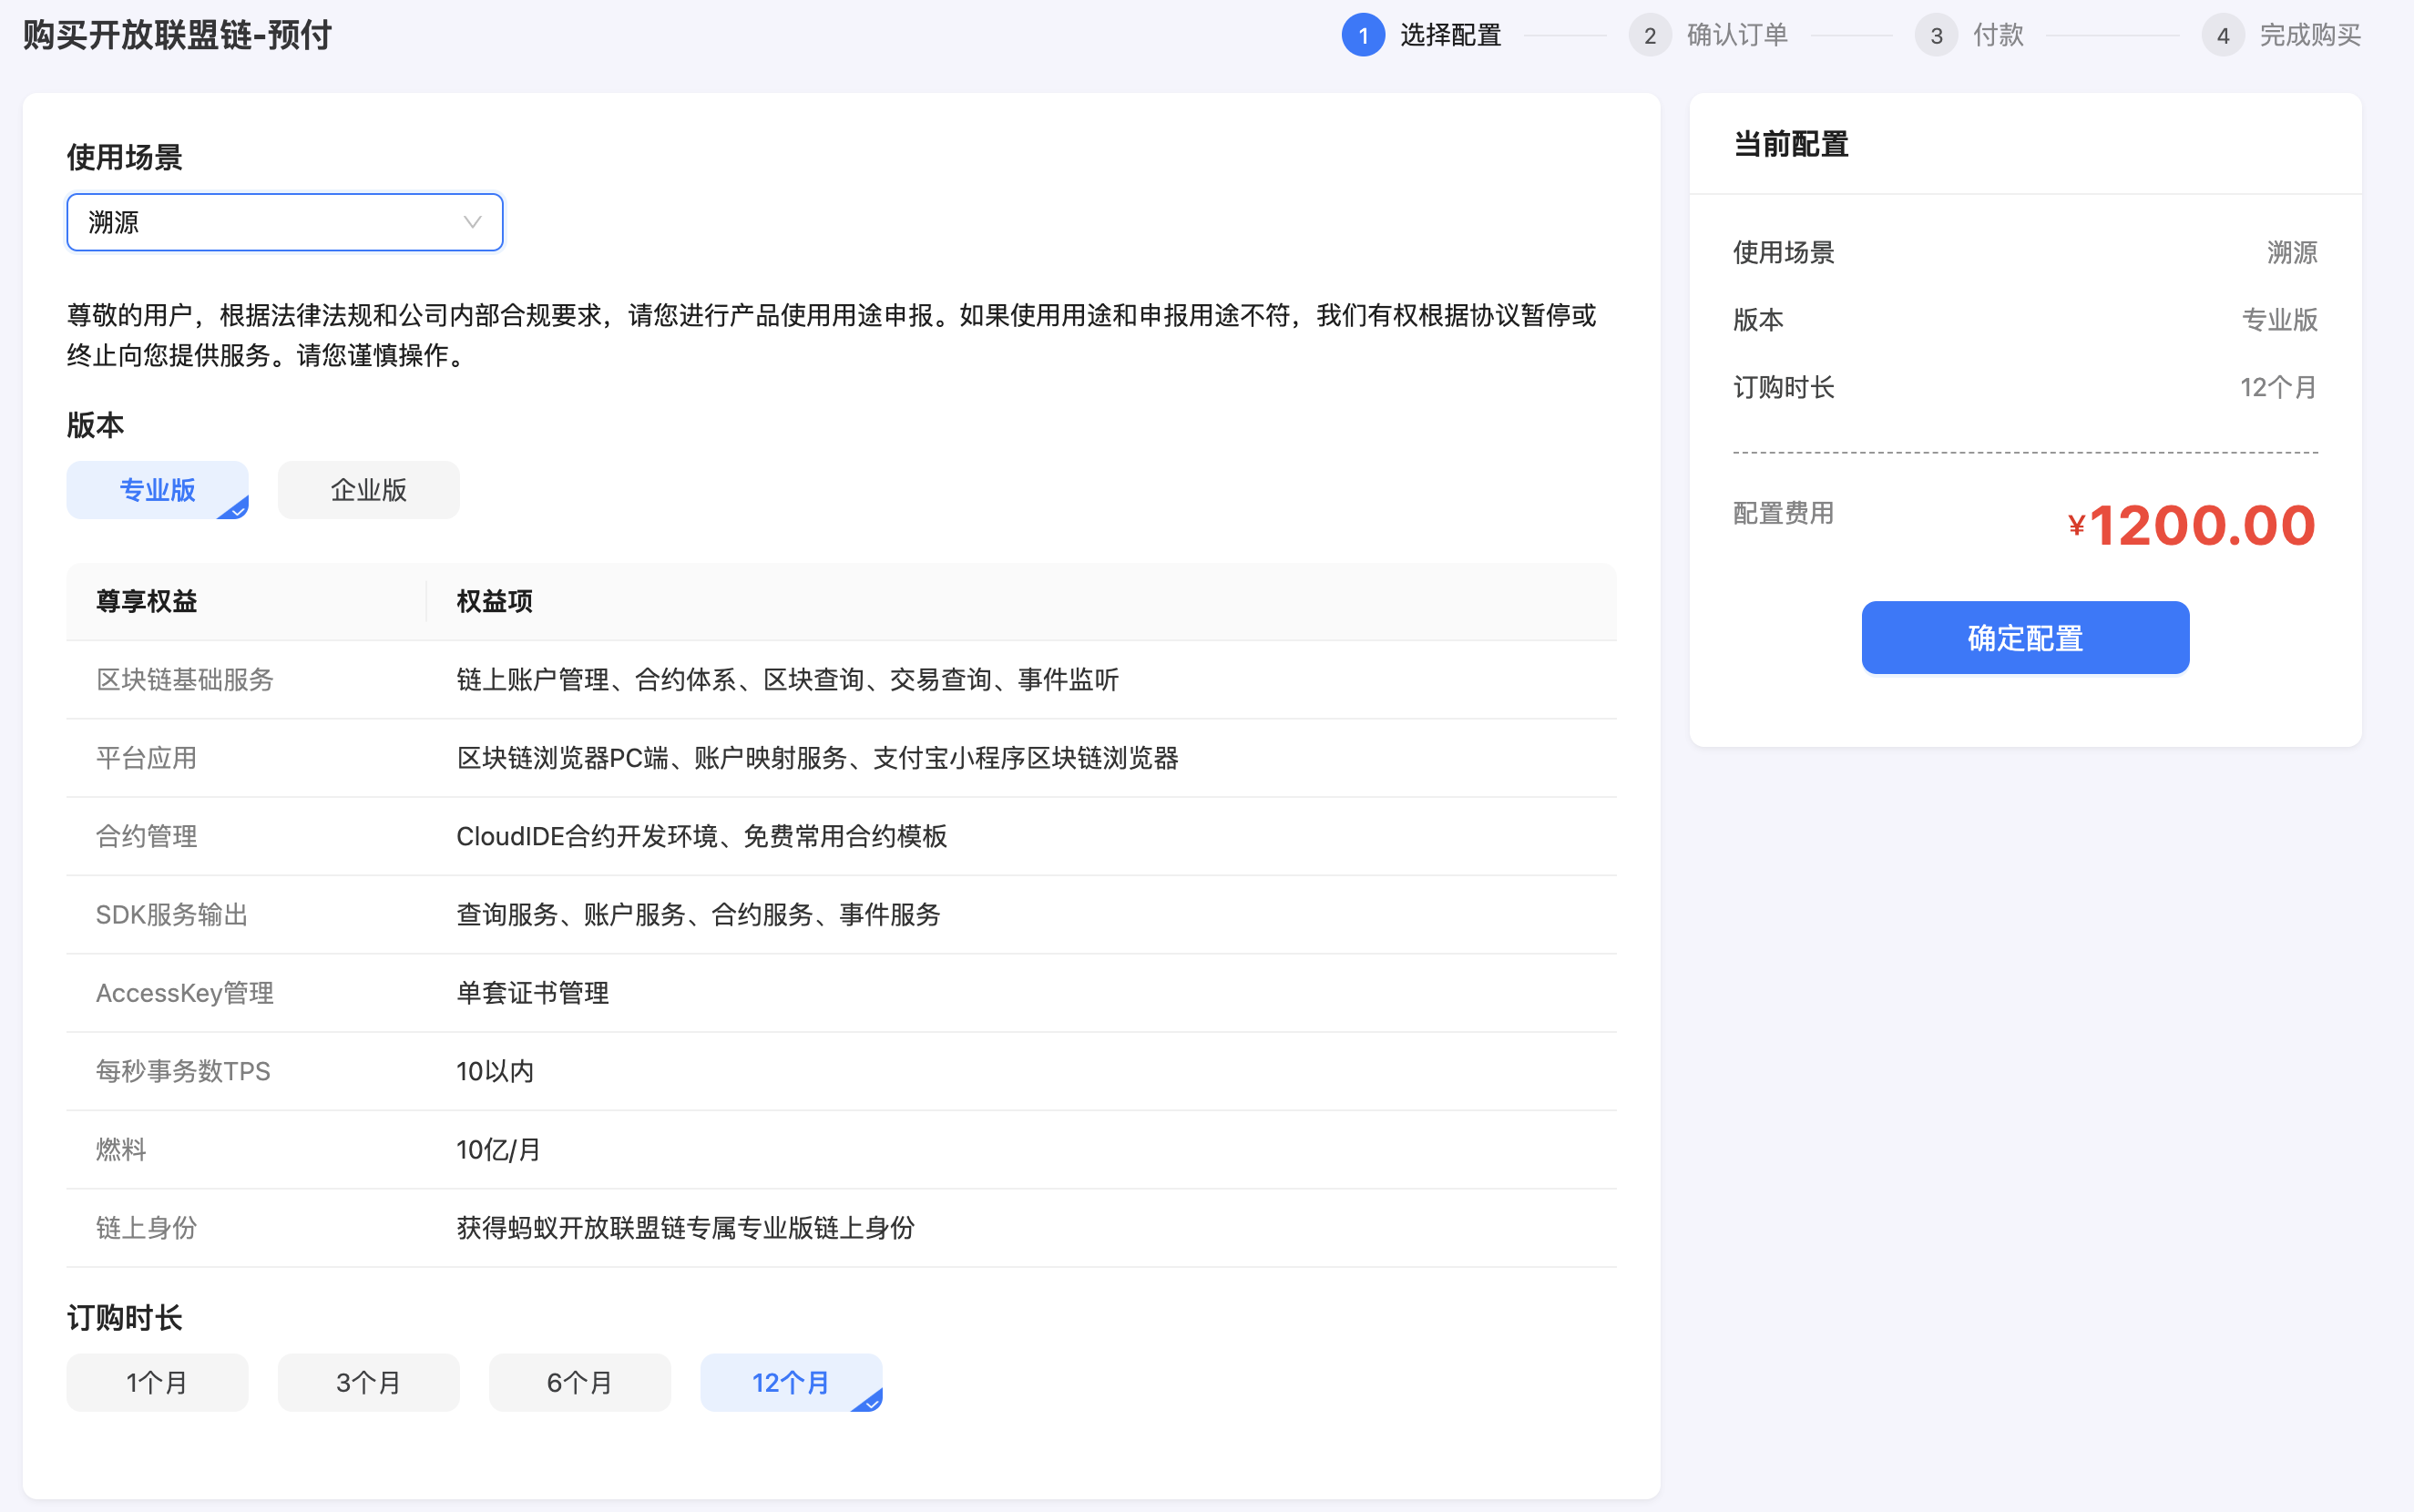
1.开通服务
认证账号,下单购买,这里选择专业版购买
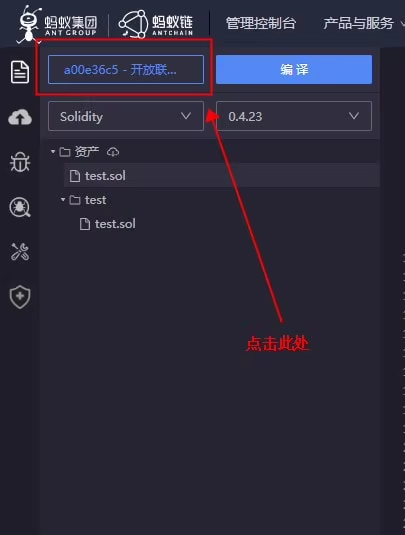
2.准备开发环境
服务开通后,进入控制台,按照页面提示的步骤依次操作即可:

包括创建 AccessKey, 创建链上账户并分配燃料
3. 开发只能合约
4.集成SDK开发
主要包括集成以下 API:
提交交易,账户操作,部署合约,调用合约,各类查询操作,监听事件等
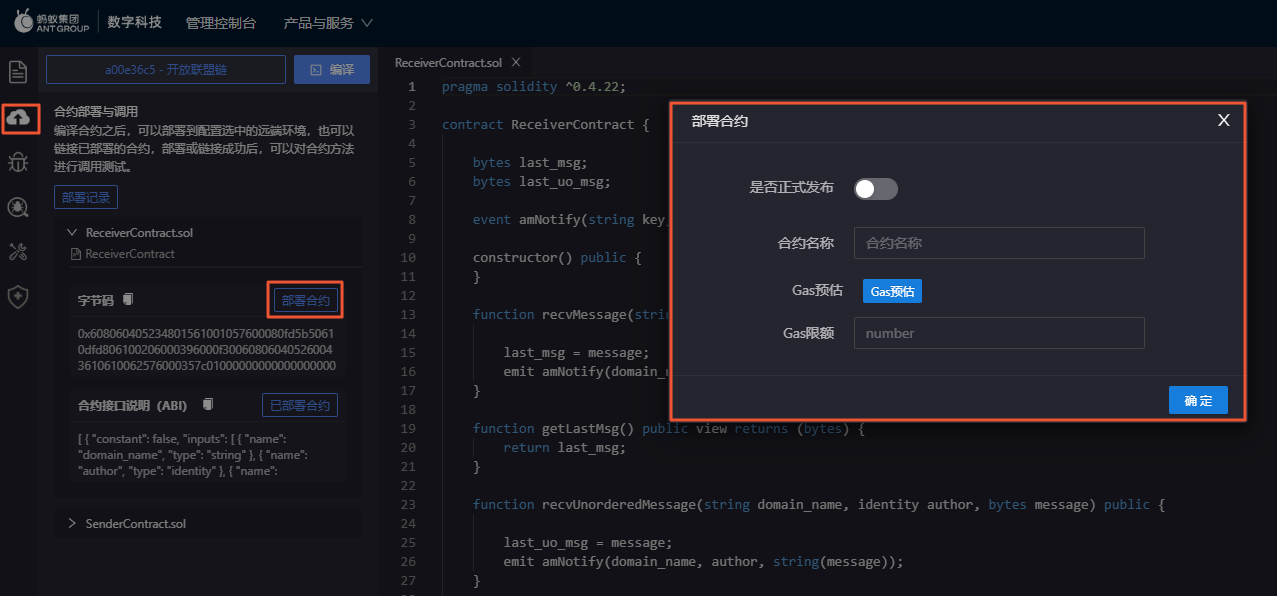
5.部署合约
首先需要通过 Cloud IDE 编译合约,
编译通过后,可以将合约部署至开放联盟链进行测试
6.查询链上交易数据
- 使用区块链浏览器, 查看交易情况和历史数据,包括节点信息、块信息等信息。
- 使用数据洞察服务,可以查询查看以下数据:
- 业务数据搜索
- 技术数据搜索(支持链、区块、链上账户、链上合约、链上交易的搜索)
- 洞察看板视图(支持自定义添加看板、管理看板视图)
- 链上数据详情(支持交易详情、区块详情、账户详情、合约详情的查看)
参考资料
蚂蚁开放联盟链实战:03-语言基础
Solidity 语言基础
Solidity 是一种基于 Ethereum 平台的编程语言,用于编写智能合约。
📌 一、基础类型与变量
值类型
bool:布尔值(true/false)
uint/int:无符号/有符号整数(如 uint8, int256)
address:存储 20 字节的以太坊地址
bytes:固定大小字节数组(如 bytes32)
string:动态长度 UTF-8 字符串
引用类型
array:数组(可动态或静态,如 uint[])
struct:自定义数据结构
mapping:键值对映射(如 mapping(address => uint))
数据位置修饰符
storage:永久存储在链上
memory:临时变量,函数执行后销毁
calldata:只读的临时数据(常用于函数参数)
⚙️ 二、函数与修饰符
函数声明
function:定义函数
returns:声明返回值类型(如 returns (uint))
view:承诺不修改状态
pure:承诺不读/写状态
payable:允许函数接收 ETH
函数行为控制
modifier:定义函数修饰器(如权限检查)
constructor:合约部署时执行的初始化函数
fallback:处理未匹配函数调用的默认函数
receive:专门接收 ETH 的函数
🔄 三、流程控制
if/else:条件分支
for/while/do:循环控制
break/continue:中断或继续循环
return:从函数返回值
📦 四、合约与继承
合约结构
contract:定义智能合约
interface:声明抽象接口(无实现)
library:定义可复用代码库
继承与抽象
is:实现继承(如 contract A is B)
abstract:标记合约未完全实现
virtual:允许函数在子类中被覆盖
override:显式声明覆盖父合约函数
⚡ 五、特殊变量与错误处理
全局变量
msg.sender:当前调用者地址
msg.value:随调用发送的 ETH 数量
block.timestamp:当前区块时间戳
错误处理
require:验证条件,不满足则回滚
assert:检查内部错误(如溢出)
revert:主动终止执行并回滚
error:自定义错误类型(Gas 效率高于 string)
💎 六、其他关键操作符
new:创建新合约实例
delete:重置变量为默认值
emit:触发事件(如 emit Transfer(…))
enum:定义枚举类型
event:声明事件(用于日志记录)
鸿蒙Flutter实战:01-搭建开发环境
准备工作
1.安装 DevEco Studio NEXT IDE, 注意版本应该是 Next,当前最新的是 Beta3
2.安装Git, 如果要同时适配安卓,需要安装Android Studio; 如果要适配ios,需要安装Xcode
Mac 安装(推荐)
环境变量配置
1 | # Flutter Mirror |
Windows 安装
配置用户变量
1 | FLUTTER_STORAGE_BASE_URL=https://storage.flutter-io.cn |
配置环境变量
编辑 PATH,添加以下路径
1 | C:\Program Files\Huawei\DevEco Studio\tools\ohpm\bin |
管理多个 Flutter 版本
如果在项目开发中,需要使用多个 Flutter 版本,可以考虑使用 fvm
- 安装 FVM
- 使用 fvm 官方 flutter 版本
1 | fvm install 3.22.0 |
- 安装自定义鸿蒙版本,进入 fvm/version 目录,通常位于用户目录下,如
~/fvm/versions/3.22.0,
拷贝仓库并重命名为custom_x.y.z的名字
1 | git clone -b dev https://gitcode.com/openharmony-sig/flutter_flutter.git custom_3.7.12 |
注意命名格式必须为
custom_x.y.z,即必须以 custom_ 开头,后面跟三位数字版本号,如custom_3.7.12
- 在项目中使用单独的 flutter sdk 版本, 在项目目录中执行:
1 | fvm use custom_3.7.12 |
常见问题
- 运行 flutter doctor 出现
Error: Unable to find git in your PATH.
执行以下命令
1 | git config --global --add safe.directory '*' |
案例
Flutter 鸿蒙交流群
【flutter鸿蒙技术交流群】
目前 Flutter 鸿蒙已经跑通,但仍然存在一些潜在的坑需要解决和处理,欢迎大家一起分享交流
请扫码加小助手进群:
备注:鸿蒙Flutter
wx:zacksleo

参考资料
鸿蒙Flutter实战:02-Windows环境搭建踩坑指南
环境搭建
1. 下载Flutter SDK,配置环境变量
鸿蒙 Flutter SDK 需要在 Gitee 下载。目前建议下载 dev 分支代码。
需要配置以下用户变量
注意鸿蒙开发需要安装Java和配置相关变量
1 | # flutter sdk 镜像 |
配置环境变量
编辑 PATH,添加以下路径,鸿蒙开发需要配置ohpm, hvigor及node
1 | C:\Program Files\Huawei\DevEco Studio\tools\ohpm\bin |
SDK 下载完成,环境变量配置妥当后,使用 flutter doctor 检查各项是否通过。
在命令行中,运行 ohpm -v, hvigorw -v, node -v 查看是否能使用,确保各个依赖的工具,其 PATH 配置正确。
使用 echo %DEVECO_SDK_HOME%, echo %JAVA_HOME% 等检查用户变量是否生效。
环境变量发生变化时,需要重启命令行工具。
另外,需要注意的是,优先添加用户环境变量,如果是系统环境变量,可能需要注销登录或者重启系统,否则配置可能不生效。
2. 为了避免意外情况,将新建项目位置,与SDK使用相同的磁盘,如D盘。
否则可能出现 package 找不到的情况。
另外,项目目录不要过深,不然会因路径太长导致编译可能失败。
3. VsCode 无法识别设备
用 DevEco 打开项目,待项目分析完成后,Vscode 中的设备应该可以出来了。
4. 插件Har包找不到
打开DevEco运行时,出现类似以下错误
1 | hpm ERROR: missing: flutter_inappwebview_ohos@/.../ohos/har/flutter_inappwebview_ohos.har, required by entry@1.0.0 |
此时需要在Flutter项目下运行 flutter run 或 flutter build 以生成插件的 har 包
4. 如何自定义显示 DevEco 打开 ohos 后的项目名称
每个鸿蒙Flutter项目,用DevEco打开ohos工程后,默认显示的工程名称为 ohos,如果想自定义显示的工程名称,可以参考以下步骤:
在 ohos/.idea 目录下,新建一个 .name 文件,写入项目名称即可。
鸿蒙Flutter实战:03-鸿蒙Flutter开发中集成Webview
主要有两种方案
使用第三方库
如 使用flutter_inappwebview插件,在 pubspec.lock 文件中配置:
1 | flutter_inappwebview: |
或者使用 webview_flutter 插件
1 | webview_flutter: |
编写原生 ArkTS 代码实现 PlatformView
创建 entryablitiy
在 src/main/module.json5中配置ablitiy
1 | "abilities": [ |
cat src/main/entryablity/CustomFactory.ets
1 | import { BinaryMessenger } from '@ohos/flutter_ohos/src/main/ets/plugin/common/BinaryMessenger'; |
cat src/main/entryablity/CustomPlugin.ets
1 | import { FlutterPlugin, |
cat src/main/entryablity/CustomView.ets
1 | import MethodChannel, { |
cat src/main/entryablity/EntryAbility.ets
1 | import { FlutterAbility, FlutterEngine } from '@ohos/flutter_ohos'; |
创建 pages
cat src/main/ets/pages/index.ets
1 | import common from '@ohos.app.ability.common'; |
在src/main/resources/base/profile/main_page.json中配置路由
1 | { |
在 Dart 侧调用该 PlatformView
1 | Scaffold( |
参考资料
鸿蒙Flutter实战:04-如何使用DevTools调试Webview
在《鸿蒙 Flutter 开发中集成 Webview》,介绍了如果在 Flutter 中集成 Webview. 本文则为 Webview 的调试方法。
配置 Webview
CustomView.ets 文件中,在生命周期aboutToAppear处配置允许调试:
1 | aboutToAppear() { |
找到 devtools 的端口
运行 App,使用 hdc 命令连接设备,查找相关端口
1 | # 连接设备 |
如上面所示,webview_devtools_remote_43406 即为我们要调试的页面
开启端口转发
将设备中的端口转发到开发电脑上
1 | hdc fport tcp:9222 localabstract:webview_devtools_remote_43406 |
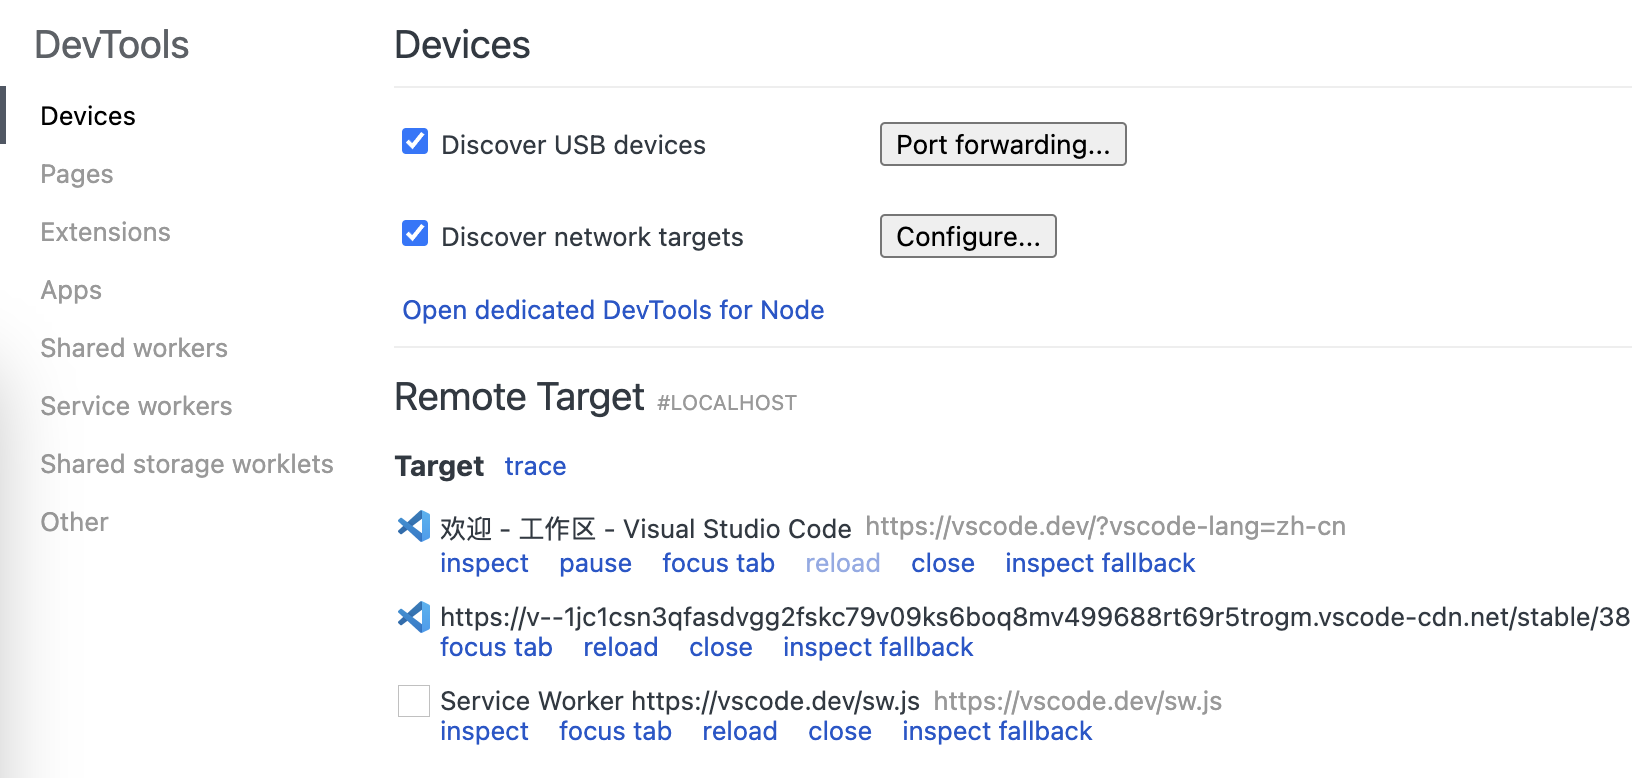
在 Chrome 中找打 Webview 并开始调试
在 Chrome 中打开 chrome://inspect/#devices页面,观察页面中RemoteTarget 处出现了相关页面
选择需要调度的页面,点击 inspect,弹出 DevTools 窗口,开启页面调度
其他
如果要在 Webview 注入 js 代码,可在 Web 组件配置处使用runJavaScript方法注入 JavaScript 脚本,如
1 | Web({src: 'https://baidu.com', controller: this.webviewController}) |
参考资料
鸿蒙Flutter实战:05-使用第三方插件
在鸿蒙Flutter开发中,如果涉及到使用原生功能,就要使用插件。使用插件有两种方式,一种是自己编写原生ArkTS代码,在Dart侧调用。另外一种是使用第三方代码。
方式一:编写原生 ArkTS 代码
该方案可以使用 PlatformView 或者 MethodChannel 调用。
PlatformView 即为在 Flutter 侧创建一个 View,然后在 Native 侧渲染。PlatformView 封装了底层的 View。
MethodChannel 即通过 MethodClannel 调用原生Native 方法。
具体操作可以分别参考文章 鸿蒙 Flutter 开发中集成 Webview 和 使用 ArkTs 开发 Flutter 鸿蒙平台插件
方式二:使用第三方代码
1.在pub.flutter.dev/github/gitee/ophm查找使用的插件,如果插件已经适配鸿蒙,则可以像其他Flutter插件一样正常使用。
2.如果插件尚未适配鸿蒙,则需要寻找适配的插件库。配置方法如下
3.如果使用的第三方插件,其底层以的库没有适配鸿蒙,则需要通过overrider配置其鸿蒙化的替代插件,否则会在运行时报错。如下面所示:
1 | dependencies: |
这里需要注意的时,如果不存在依赖冲突,dependency_overrides 可能不生效。也就是说,查看 pubspec.lock 文件,发现依赖的插件库,不存在 **_ohos 库,则说明 overrides不生效,此时使用以下方式,修改 pubspec_overrides.yaml 文件,手动添加文件。
如果 overrides 不生效, 打开 pubspec_overrides.yaml,添加以下内容,再次运行 pub get, 发现 pubspec.lock 成功添加了 **_ohos 库。
1 | dependency_overrides: |
另外,如果没有找到使用的鸿蒙化插件,则可以考虑自行编写垮端调用代码,或者编写新的插件库,作为原插件库的特定平台实现。
参考资料
鸿蒙Flutter实战:06-使用ArkTs开发Flutter鸿蒙插件
本文讲述如何开发一个 Flutter 鸿蒙插件,如何实现 Flutter 与鸿蒙的混合开发,以及双端消息通信。
Flutter侧,编写 MethodChannel
1 | const MethodChannel _methodChannel = MethodChannel('xxx.com/app'); |
代码生命了一个 methodChannel, 并实现了 token 存错的调用方法。
ArkTs侧,实现调用
编写 src/main/ets/entryability/EntryAbility.ets
1 |
|
该文件使的原生页面在加载时,配置 Flutter 引擎,注册插件。 Flutter初始化时,同时初始化了 首选项dataPreferences,以备后用。
编写 src/main/ets/entryability/ForestPlugin.ets
1 | import { Any, BasicMessageChannel, EventChannel, FlutterManager, FlutterPlugin, Log, MethodCall, MethodChannel, StandardMessageCodec} from '@ohos/flutter_ohos'; |
以上代码实现了一个插件类,其核心实现了FlutterPlugin中的 onAttachedToEngine方法,该方法在 Flutter 引擎加载成功后调用。
onMethodCall中接收来自 Flutter 的消息调用,分别实现了 ‘getPrefs’ 和 ‘setPrefs’ 两个回掉,其中 getPrefs有返回值,通过 result.success(val);(见下)异步返回,setPrefs没有返回值。
以下为 ForestApi的具体实现,使用了 HarmonyOS 中的首选项 API 设置和读取数据。
1 | class ForestApi { |
注意事项
1.双端初始化methodChannel中的名称必须保持一致,如 xxx.com/app.
2.arkTS侧通过 result.success(val) 返回数据,该过程是异步的,故在 Dart 侧需要使用 await 或者回调函数取值。
3.通信中默认只支持基础的数据类型,复杂类型的需要进行序列化或编解码。
4.在Dart 侧接收的数据为 dymanic 类型,需要进行数据类型转换。
参考资料
鸿蒙Flutter实战:07-混合开发
鸿蒙Flutter混合开发主要有两种形式。
1.基于har
将flutter module打包成har包,在原生鸿蒙项目中,以har包的方式引入。
其优点是主项目开发者可以不关注Flutter实现,不需要安装配置Flutter开发环境,缺点是无法及时修改Flutter代码,也不存在热重载。
2.基于源码
通过源码依赖的当时,在原生鸿蒙项目处,引入Flutter模块。
其优点是方便维护和更新Flutter代码,也可以使用热重载。缺点是需要搭建Flutter开发环境,开发人员需要掌握Flutter。
其项目结构类似如下:
1 | . |